
Table of Contents
Package Management: Very Briefly
Large software projects depend on several other components: called dependencies; those maybe developed by other in-house teams or may come from external sources. The same dependency maybe built for several platform and CPU architecture combinations, or possibly available in several variants. Consumers of a dependency must make sure that they have the right version and variant. Moreover, if the dependency itself is under development, each time an update is released the consumer project may need to pull and integrate that update. Additionaly, as a project’s source is distributed to other developers so must be the dependencies—preferably from a central repository. Most importantly, all of these must happen with least confusion and time.
Small projects, with few dependencies and only a handful of developers working on it, can get away with manual management. As projects get larger and more complex, their dependency also grows, so does the complexity of their management. Lack of structured package management causes tremendous confusion—and resultant frustration—among developers; they spend hours after tasks that doesn’t contribute anything to the product’s excellence. An automated package management is the only rescue in these situations.
To be short, in an automated package management ecosystem, package authors push their packages to a repository and consumers pull their desired ones from that repository. Commonly the same application handles both the push and pull operations: this application is called a package manager or dependency manager. Automated package manager takes over the package related drudgery and relieves developers from a lot of pain.
What is NuGet
Most open software platforms took package management seriously. Their dependencey management tools have been around for about a decade: like Java world has Maven since 2002.
.NET world, however, joined the race much later. Their solution to the dependency problem is NuGet: a package manager for .NET languages, originally developed by Outercurve Foundation and now owned by .NET Foundation. Since its introduction in 2010 it went popular rapidly: at present Nuget.org, the official .NET Foundation public NuGet package feed, hosts over 40,000 packages. These days NuGet is ubiquitous and it is the de facto standard in .NET world.
How NuGet Works
In this section, I will give brief overview of NuGet’s working method and the concepts involved, and in later sections, I will cover installing NuGet, publishing a sample C# project as a NuGet package, and consuming that package.
This will be sufficient to make it work in very simple situations. NuGet is, however, highly configurable and supports many advanced features that lets you handle complex environments. I will leave references for further study wherever relevant.
NuGet Package File
NuGet bundles a project’s build artifacts into a single .nupkg file for distribution. It includes project output, any auxiliary files (as configured by user), meta information, reference to other packages, etc. A single .nupkg file represents a distinct version of the package; that is, each time you publish a new version of your package, you create a new .nupkg file.
As a file format, .nupkg is essentially an archive. Get a .nupkg file and open it with WinRAR and explore what’s inside for better insight.
NuGet Package Directory Structure
Inside the .nupkg archive, package contents are organized in directories. Depending on the configurations specified, a package’s directory structure may be very complex. Usually, however, NuGet organizes package contents in the following directory structure:
package-name.version
|--lib\
|--content\
For short, the contents inside lib are added to the target project’s reference and contents of the content folder is copied to the target project’s root path.
NuGet Project Manifest (.nuspec) File
Each package published by NuGet is coupled with a manifest file (an XML configuration file.) This file specifies how the package is going to look like: it describes a package’s identity, its file organization, what consumers will get or not, and many other things. Here is how a sample nuspec file looks like on its creation:
1
2
3
4
5
6
7
8
9
10
11
12
13
14
15
16
17
18
<?xml version="1.0"?>
<package>
  <metadata>
    <id>$id$</id>
    <version>$version$</version>
    <title>$title$</title>
    <authors>$author$</authors>
    <owners>$author$</owners>
    <licenseUrl>http://LICENSE_URL_HERE_OR_DELETE_THIS_LINE</licenseUrl>
    <projectUrl>http://PROJECT_URL_HERE_OR_DELETE_THIS_LINE</projectUrl>
    <iconUrl>http://ICON_URL_HERE_OR_DELETE_THIS_LINE</iconUrl>
    <requireLicenseAcceptance>false</requireLicenseAcceptance>
    <description>$description$</description>
    <releaseNotes>Summary of changes made in this release of the package.</releaseNotes>
    <copyright>Copyright 2015</copyright>
    <tags>Tag1 Tag2</tags>
  </metadata>
</package>
As you see, initially it consists only of a ‘metadata’ section that describes the package; only id, version, title, author, and description in this section are mandatory.
A very useful additional section is ‘files’: where you specify additional files to copy with the package. Files section follows the following basic form:
<files>
  <file src="source file path" target="target file path" />
</files>
To include additional files to your package, add a file section in the nuspec file and add as many files as you need.
Nuspec files and NuGet overall have excellent integration with Visual Studio and MSBuild. You don’t need to create nuspec file for Visual Studio projects manually; we will see later, nuget spec command will create one for you. Additionally, you can specify certain values as replacement tokens (by enclosing their names between ‘$’ signs: as it is done for id, version, and some others in the sample above), then as you build the package NuGet picks up the values from project file. Once you have the nuspec file under a project directory with same name as the project, you are nearly ready to publish your project as a NuGet package!
For exahustive coverage on nuspec file see official Nuspec reference.
NuGet Client
Coordinating both package publication and consumption, NuGet client is at the heart of NuGet package management environment. It is available in three formats:
- As Command Prompt utility: called NuGet Command Line.
- As PowerShell console: called NuGet Package Manager Console.
- As Visual Studio GUI tool: called NuGet Package Manager Dialog.
Among them only NuGet Command Line can create and publish packages; though NuGet Command Line can handle package consumption as well, the rest two are more commonly used for that job.
Aside: rather secretly, in Windows 10 Microsoft has introduced a Linux style package manager, called OneGet. It comes as PowerShell commandlet and interestingly many OneGet commands resemble NuGet ones!
NuGet Feed
Provider of NuGet packages. A feed can be a local or network shared directory (local feed in NuGet jargon) or a web server (remote feed in NuGet jargon.) Feed manages the location where packages are stored by package publishers and pulled from by consumers.
NuGet client can handle multiple feeds. Unless configured otherwise, client picks up package sources from %APPDATA%\NuGet\NuGet.Config file.
Other Tools
Outside the above-mentioned, there are various other tools developed by external projects that enhance NuGet functionalities. For an overview of those tools and projects and their relationship with NuGet, see the official NuGet Ecosystem documentation.
Setting Up NuGet
Install NuGet Client
Installing both the command prompt utility and the Visual Studio extension, which also includes the PowerShell Package Manager Console, are straightforward and I recommend having both.
Download the NuGet command line utility from its home page (it is only a single .exe file), copy it to your desired location, and add the path to your system’s path environment variable.
NuGet Package Manager extension comes pre-installed in Visual Studio 2012 or later. In earlier versions, install it through Tools > Extensions Manager. Once installed, you can access both the Package Manager Dialog and the Package Manager Console from Tools > NuGet Package Manager menu in Visual Studio.
Setup NuGet Feed
Setup a network path with write permission to package authors and read permission to package users (for this article I will use \\farhan-lenovo\nuget-feed); this will be your NuGet feed for now.
Authoring NuGet Packages
Create a new C# project named Miscellaneous and set the output type to class library. Add whatever classes and functionalities you want.
Open Command Prompt or Powershell and switch to your project directory.
-
Create the project manifest file, Miscellaneous.nuspec, with this command:
nuget spec Miscellaneous -
Fill in the usually missing mandatory fields, AssemblyDescription and AssemblyCompany, in the project’s AssemblyInfo.cs file.
-
Update assembly version.
-
Build the project.
-
Build package with the following command:
nuget pack Miscellaneous.csprojThe package file, named Miscellaneous.version.nupkg, is created.
-
Move package to feed location.
move Miscellaneous.version.nupkg \\farhan-lenovo\nuget-feed
Publishing first release of the project done! Assuming you don’t change meta information of the package, to publish every next version, performing steps 3 to 6 will do.
Consuming NuGet Packages
You can consume NuGet packages through all three variants of NuGet client that I described earlier. Among them, however, I find the Package Manager Dialog more suitable for an introduction; in the following sections, I am going to show basic NuGet package management operations with this. Once you get used with the Package Manager Dialog, you can pick up the other two clients, Command Prompt and Package Manager Console, by studying their references yourself.
Configuring Package Source
First step to using NuGet packages is to configure your package sources. By default only one, nuget.org, feed is available as package source. To add your own feed, do the following steps:
- Open NuGet Package Manager configuration dialog box in Visual Studio (Go to Tools > NuGet Package Manager > Package Manager Settings > Package Sources.)
- Click the + sign near the top-right corner.
- Put a name for your source in the Name field (Test Package Source in my case.)
- Put the shared folder path to be used as package feed (
\\farhan-lenovo\nuget-feedin my case) in Source field and click OK.
You are done!

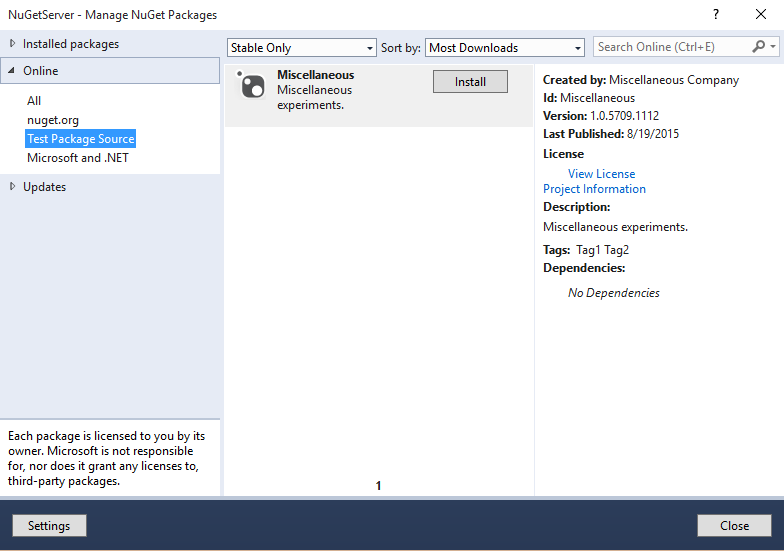
Installing Packages
Now let’s install the package Miscellaneous, that we published earlier, in some other project. Open the target project in Visual Studio, go to Tools > NuGet Package Manager > Manage NuGet Packages for Solution… The package browser window will appear; in the Online tab find and select Test Package Source. All packages available in the current feed, including Miscellaneous, is listed here. Select and click the install button beside Miscellaneous.
If your package installation is successful, you will see these changes in your project: a library called Miscellaneous.dll is added to the project references, a new folder called packages is created under your solution directory, and a file called packages.config is included in your project. The ‘packages’ folder contains the package you just installed and all further packages you install in any other project under the same solution; the ‘packages.config’ file contains information of the packages the project is dependent on in XML format.
Updating Packages
Suppose you have made some changes to the package Miscellaneous and want to publish a new version. Make the changes you wish and follow steps 3 to 6 in section Authoring NuGet Packages to have the new version published.
To get the update, open package browser window just the way we did it during installation, select the ‘Updates’ tab, select ‘Test Package Source.’ The package ‘Miscellaneous’ should appear with an ‘Update’ button beside it. Click the ‘Update’ button to install the updated package.

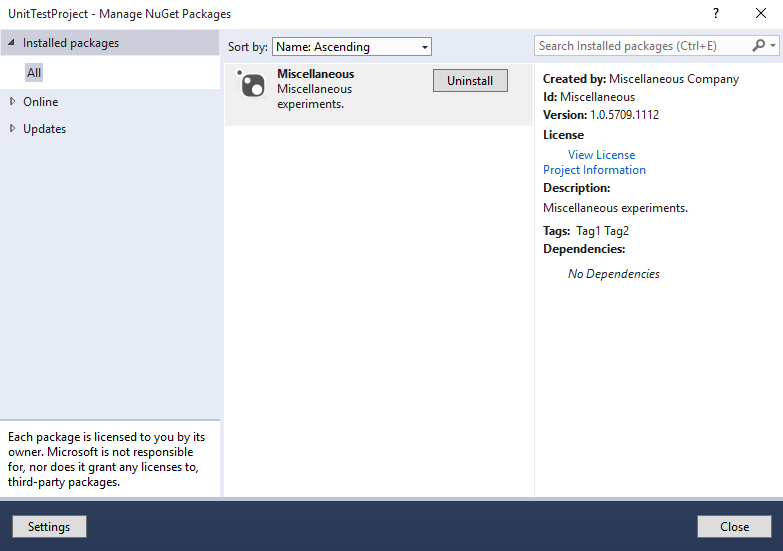
Uninstalling Packages
Open package browser window, select ‘Installed Packages’ tab. The package ‘Miscellaneous’ should appear here with an ‘Uninstall’ button beside it. Click that Uninstall button. Package is uninstalled; the reference to ‘Miscellaneous.dll’ as well as the folder ‘Miscellaneous’ in packages folder under solution directory disappears if uninstallation is successful.
Restoring Packages
NuGet can fetch missing packages from feed automatically—a feature called restoring packages. Package Manager Dialog doesn’t support package restoring; however, by default Visual Studio restores packages on each build. Do the following to test the package restore feature: have the package Miscellaneous installed in some project, delete or rename the packages folder under your solution directory, build your solution from Visual Studio. If build is successful the packages folder under solution directory must be available again with its contents.
External Links
- NuGet Home
- MyGet. Personal and enterprise NuGet hosting.
- NuGet Package Explorer. GUI tool for NuGet package viewing and management.